
- Download count 1565
- Pageviews 3960
- Unique foldername muse1
- Skin for
- Track Mod for
- Based on
- Release date 1999-03-09
- Version from
- Version
- RVW-ID 31438
- Category Standard Track
-
Score
 72/100
(28 votes)
72/100
(28 votes)
- Unconventional car?
- Construction
- Engine
- Transmission
- Top speed mph
- Total weight kg
- Acceleration m/s²
- Construction 3D Modeling (Original)
- Track difficulty Hard
- Track length 668 m
- Reverse version available? Yes
- Time trial times available? Yes
- Practice mode star available? Yes
- Online multiplayer compatible?
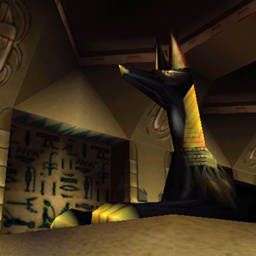
Museum 1 is a standard track created by Acclaim Studios London. It is the last track of the Hard difficulty as well as the last track in the Gold Cup Championship. The scenery in this track heavily features Egyptian exhibits, in contrast to the space exhibits in Museum 2.
As the last track of the Hard difficulty, Museum 1 is infamous for its plethora of hard-avoiding obstacles and its extreme use of tight and narrow turns. Due to this, it is considered to be one of the hardest tracks in the game, with its difficulty comparable to some of the tracks in the Extreme difficulty.
Racers start in the foyer of the museum, labelled with a queue gate. Ahead of them is a ramp that takes them upwards. A sharp 90 degree right turn occurs right at the peak of the ramp, followed by a soft right bend.
A tight left hairpin occurs, which leads to a steep downwards slope, with an imminent left turn at the end. The turn leads the racers to a dinosaur display room. As soon as the vehicles enter the room, they must make an immediate right turn indicated by the sign ahead of them and head towards a hallway, which starts with a strong left turn.
A long straightaway then ensues. At the middle of the straight is a dark passageway. The passage is an upward inclining ramp that seemingly takes the players to the next level of the museum, which is the Egyptian section. Here, the straight ends into a blind left corner through a very short tunnel which eventually leads the vehicles right onto a display of an ancient Egyptian scarab. Following the display, there are two opening hallways, in which racers must first take the right one. Vehicles can drop off the display to reach the entrance. Alternatively, they can bear right where there is a narrow tunnel that is normally used in Reverse mode. Both paths lead into the museum's main dinosaur exhibit, which consists of a Triceratops skeleton above a luxurious red carpet.
At the end of the exhibit is a hard narrow left turn that then leads to an empty room. Racers must reach the end of the room from the left side and do a 180 degree turn into the right side as denoted by the oncoming sign. There, vehicles must drive on the opposite direction and head back onto the fork intersection where they entered the hallway, and this time take the first path.
Following a sharp left on the first hallway leads into a room with a ramp taking them to another level. Once there racers can either take a left or right turn. The left path leads to a section with a multitude of tables in which the racers must go over. It also contains a narrow S-bend after the room with tables, culminating to a final left turn onto a narrow blue scaffold that lies just above the main floor of the museum. After a small jump from the ramp and a quick right turn, the racers are taken back to the starting line.
Taking the right path leads the vehicles onto a dark balcony that is located on top of the empty room. A 180 degree left turn occurs on the balcony, taking the racers to a highly secured room that contains many precious artifacts inside, an area that is often used in Reverse mode. There is a left turn at the end of the room. Taking this turn will lead back onto the main floor. After the same final right turn as the first path a few meters ahead, the lap is completed.
Unlike Museum 2, Museum 1 exaggerates closed narrow corners which makes the cars collide constantly, mainly at the first descent road (with Egyptian columns at sides) where the player needs to slow down to avoid crashing. Also, some meters after, the cars are thrown under a corridor wall due the jump beside it, which is by far one of the track's hardest obstacles, as there is also a luck factor inherent to this section.
The Triceratops' feet are an obstruction because they can act as an inconvenient bump on the road. Any vehicle that goes over it risks major derailment, wasting time. Avoiding this is difficult as the raised platform of the red carpet partially conceals the hazard, giving racers very little time to react.
The room with the two tables in particular also prove to be a major hazard as they are located near the final stages of the track. Players must take care not to collide with the legs of the table as they will scatter vehicles quite badly. The distance between the preceding corner and the room is very little, giving drivers almost no time to react.
The last jump through a narrow and exposed scaffold is also difficult, as it requires the player to angle their vehicle correctly before entering. Missing the final ramp could make or break the race.
Overall, the combination of Museum 1's complex and narrow layout and its near-unavoidable obstacles makes the track one of the most grueling and brutal in the game, demanding a great deal of memorisation from the player to succeed. Tasks such as beating the Challenge times in Time Trial are much more difficult as a result.
Text taken from the Re-Volt Wiki.


In terms of visuals and designs this is one of the best in that category, but everything else about this track sucks. Prime example is the very tail end of the track where you have to make a complicated turn and go down a little metal ramp design with no rails that ruins the flow of the track. Even the CPUs struggle on this track with the flow and picks are placed in terrible spots to reach for the most part.
I have to agree with most people here, this track is probably the weakest in the Vanilla Game.
It’s Challenging, yes, however it comes at the cost of the course being any fun at all.
I always dread having to do this, don’t even get me started on beating the Challenge Times for it.
I definitely understand why this track gets so much hate, but I personally kinda like it. The difficulty and level of memorization required is no worse than a lot of custom tracks out there (Venice, Helios, and Grisville come to mind). And once you do get good at it, taking the AI to school is very satisfying.
Honest Reviews with Rynii-chan – Episode 1: Museum 1
First off, I know I already commented on this track before, but I have been wanting to make detailed reviews of content that I race on/with and stuff that catches my eye. So I decided to start here (after failing to beat the damn impossible reverse challenge time!).
Raceline: -100,000/5 (only shown as 1 star in the website). I ABSOLUTELY HATE HOW BRUTALLY DIFFICULT THIS TRACK IS OH MY GOD!!!!!
Visuals: 5/5. I always love how well-designed the visuals are in all of the vanilla tracks. This one really stands out because of the reflective flooring, and the beautiful uses of those lighting effects.
Effects: 5/5. I… arleady explained that in the “Visuals” segment.
Overall Fun: 1/5. Sure, the visuals are stunning, but the EXCRUCIATINGLY FATAL difficulty of this track is what made me fall off of a cliff when I reviewed this segment.
So… overall, good visuals, but this track literally TORMENTS you like Mario Kart 64!
But since this is a vanilla track, I can’t really help you avoid this cursed track. It SHOULD’VE been in the Platinum cup and instead Acclaim should’ve placed Toytanic 2 in the Gold cup since that is 1,000 times easier!
Overall Score: 2.2 of 5 stars. Wow, that’s bad!
Sincerely – Rynii-chan
The design of the map and the looks of it are acceptable, but how you have to race this and the route design are UNACCEPTABLE!
This might be (mostly) everyone’s most-hated vanilla track… EVER! Even I hate it to the max!
It’s like the Pest Control/Fulon X of tracks. Good design, but a NOTORIOUSLY GODAWFUL and CRAPPY choice for the routes.
It should’ve belonged to the Platinum Cup and it needed to be set to EXTREME difficulty.
“Congratulations, Acclaim! You’ve ruined pizza!”
Why are the “… 1” maps placed last?
I guess the Museum 1 should be placed at Extreme category.
I guess I will just have to explain Racer’s comment then.. Late, sure, but eh. It’s not “fun” to constantly deal with this track’s offerings of exclusive wallbangs and rolling over. It’s frustrating, and I doubt it’s any fun whether you play this single player with or without bots or in multiplayer. Masochists might enjoy a track like this, but a sane person won’t. I don’t know, does that sound so hard to understand? I guess so.
I think this is the best track, and it’s fun to ride it and always roll over, I don’t understand why many people don’t like this track🤣
This track is basically a simulator of banging into walls and because of how Re-Volt’s AI works, the bots are horrible at it as well. It’s the only stock track that I have completely removed from my game and replaced with a different one.
This traumatized me at a young age.