

- Download count 1639
- Pageviews 3666
- Unique foldername
- Skin for
- Track Mod for
- Based on
- Release date 2014-10-30
- Version from 2015-02-27
- Version
- RVW-ID 33254
- Category Tool
-
Score
 99/100
(17 votes)
99/100
(17 votes)
- Unconventional car?
- Construction
- Engine
- Transmission
- Top speed mph
- Total weight kg
- Acceleration m/s²
- Construction
- Track difficulty
- Track length m
- Reverse version available?
- Time trial times available?
- Practice mode star available?
- Online multiplayer compatible?
- .fin
- .hul
- .ncp
- .prm
- .m
- .rim
- .vis
- .w
This is jigebren's Blender Plugin for Re-Volt files. It is intended to be used with Blender 2.73a. Blender 2.79b and the Blender 2.8x series are not supported.
The following formats are currently supported for both importing and exporting:
IMPORTANT INFORMATION: Although the plugin's readme says that redistribution of this plugin is not allowed, jigebren gave his explicit permission via email, saying his tools can be redistributed on Re-Volt World.
Changelog
2015.02.27 (Blender 2.73a)
FIX: When updating a texture in the Image Editor ([Alt+R]), the Colorkey transparent pixels turn to black and you have to use the ColorKey button in the Texture section of the Re-Volt panel to make them transparent again. But the change were not updated in the 3D views. This should be fixed now.
MOD: Using the ColorKey button will also reload all the textures from file (it means you'd better use this button instead of the Blender [Alt+R] shortcut when working for Re-Volt).
FIX: The "Also export .ncp" to export the NCP at the same time when exporting a W didn't work.
2015.01.10 (Blender 2.73)
FIX: Missing "Set" operator in NCP Faces Material. (report: Lo Scassatore)
FIX: Bug when exporting PRM with multiple LoD. (report: Mladen007)
ADD: A new "Add LoD" button makes it very easy to setup several Level of Detail for PRM. It duplicates the current Mesh and automatically appends "|q0", "|q1", etc. to the Mesh name (then you can edit or replace the mesh by a lower poly version). It's grayed out when 5 levels already exist (LoD limit in Re-Volt). Just for info: as usual, use the "Browse Mesh Data to be linked" at top of the Object Data panel to select which LoD you're working on. BTW,when exporting to PRM it doesn't matter which LoD is currently linked.
ADD: A new "Del LoD" button to easily remove one Level of Detail.
FIX: Should no longer crash because of empty PRM when importing FIN.(report: zorbah)
REM: Cleaned up old TexAnim support code.
FIX: An issue with the Slot Time in the TexAnim panel.
MOD: Improved the import-export support for TexAnim data. Likely fixed an UV orientation issue as well.
2014.10.30 (Blender 2.72)
MOD: Vertex Color layer advanced mode. Aside from being textured, a face in Re-Volt can also be painted with a color. The default color is white and let the texture unmodified, a darker color will darken the texture accordingly. This can be used both to give objects a color (like cars in Clockwork Carnage mode) and to draw shadows.
Let's take the simple case of a cube: We want to draw it blue and make the side and bottom faces darker (as they receives less light than the top face). So the top is painted in light blue (RGB: 0, 0, 1), the sides in a darker blue (0-0-0.5) and the bottom in dark blue (0, 0, 0.25). If we decide later to change the color to green instead of blue, we'll have to draw the proper shading for each face again. With the advanced mode, we can create one layer for the color (filled with blue), and one or several layers for the shading (using shades of grey to darken or lighten the color). Note that this is only internal to the Blender plugin. When exporting all layers are merged to a simple regular color.
Workflow:
1. For a PRM object, use the "Setup PRM" button in the RV panel to create the default Vertex Color layers (Col and Alpha). For a world use 'Setup W'.
2. Then use "Add 'light'" to create the 'color' layer as well as a 'light' layer.
3. Using the cube example again, on the 'color' layer, we paint all faces in blue (0, 0, 1).
4. On the 'light' layer we paint only shades of grey. Neutral grey (0.5, 0.5, 0.5) on the top, darker grey (0.4, 0.4, 0.4) on the sides, and even darker grey (0.2, 0.2, 0.2) on the bottom.
5. Use the "Update 'Col'" button each time you want merge the 'color' and 'light' layers to the 'Col' layer and see the result. It is also automatically done when exporting. Important: don't forget that editing 'Col' directly is now useless as it will be overwritten at each export. As a reminder the greyscale buttons are greyed out (but not deactivated) when a layer other than 'light' is active.
Merging mode:
For the 'light' layers, the neutral grey color is a 50% grey (0.5-0.5-0.5), it means that using it for 'light' lets 'color' unmodified. A darker grey darkens the color, a lighter grey lightens the color. White for 'light' gives white no matter what 'color' is. The same goes for black.
In case you'd like to revert to the regular layers behavior, just delete the 'color' and 'light' Vertex Color layers.
More that one 'light' layers can be added, for example one can be used to draw volumetric shading, and another to apply a casted shadow. All 'light' layers are summed before being merged with 'color'.
Instead of a pure shades of grey, it is of course also possible to use colored light on the 'light' layer, like for example (0.55, 0.55, 0.35) for a warm light effect.
ADD: Vertex Color Paint & Select modes in (Edit mode in the RV panel when there's at least one Vertex Color layer). This can be used to quickly apply predefined shades of grey or any other color to a mesh. Very convenient to apply shadows / lights to a world, a car or an object. Note that this works directly in Edit Mode, not in Vertex Paint mode. It works in respect to the Mesh Select Mode (which is set with [Ctrl + Tab + (1 or 2 or 3)]), that is to say that if you paint a face in Face mode, the painting is sharp, adjacent faces are unmodified. While if you paint a face in Vertex mode, all the faces sharing the selected vertices are modified. Remember that vertex color is not visible in Solid shading. Switch to Textured mode [Alt+Z] to see the result.
ADD: Use the hourglass cursor while waiting for import / export operation.
ADD: (TexAnim panel in Edit mode) A button to rotate the face vertices order. This looks similar to Blender "Mesh/Faces/Rotates UVs" but it doesn't rotate the UV, it actually rotate the face vertices order. It can be used to align orientation of all faces sharing the same TexAnim slot. Just remember to avoid using it on the face you'll use to define the first frame as the result will likely not be what you expected (for this face, you'd better use "Mesh/Faces/Rotates UVs").
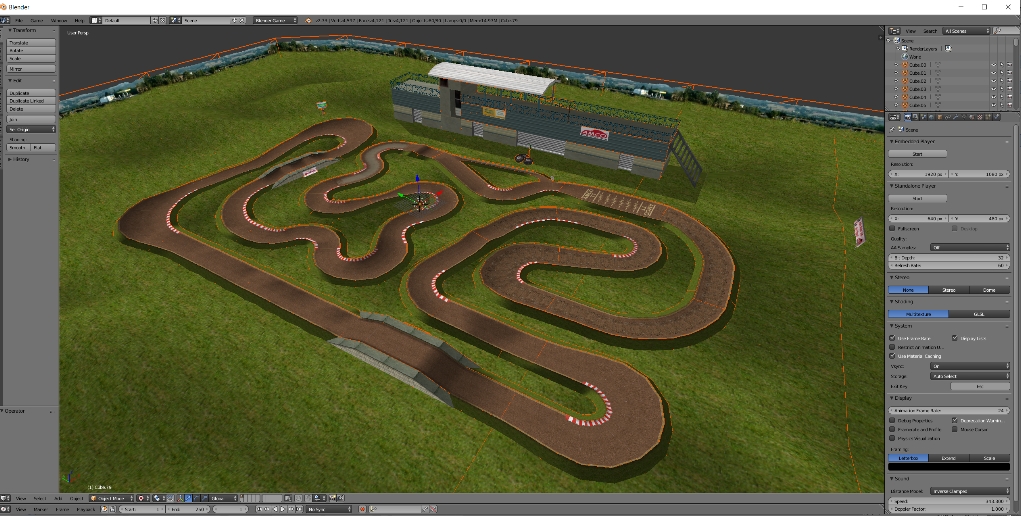
MOD: The TexAnim support has been totally revamped. The add-on should now support importing / exporting of a world with any possible cases of TexAnim data without any loss. Previously, only basic animations could be imported, and even the export needed some workaround like one single type of transformation per Blender object/mesh. Now, the TexAnim slots are placed into a Python list, and a Python script file is used inside Blender to generate the data. When importing a world file, the full list of TexAnim data is simply written as is in the script file. When creating a world from scratch, any imaginable texture animation (within the Re-Volt limits) can be generated using Python code. A handful of predefined functions are already accessible for most animation needs like translation, rotation, array of images, etc.
This is still unfinished (old code has not been totally removed yet) and needs a dedicated documentation, but basically the workflow when creating a world is:
1. In the TexAnim sub-panel (in Edit mode), select the TexAnim slot to be edited. Select all faces that you want to animate and use "Apply" to set the Slot and TexAnim properties to these faces.
2. Set the default duration of each frame (in seconds) for this slot in "Time". Then select one face with the proper texture and UV mapping and use "As first frame". This internally sets the data for the first frame of this TexAnim slot. This will also copy/refresh the UV to all faces using this TexAnim slot for all visible objects. If the UV orientation is incorrect on some faces, use the "Rotate Face" button in the TexAnim panel to align them with the first face (just avoid using this button on the first face itself as it will break the alignment with all other faces).
3. Use "Open TexAnim Script". In this file you can generate the remaining frames in Python 3. Look at the examples to see how you can use the previously-defined first frame as a basis. Note that the script is automatically executed each time the world is exported.
MOD: All case of degenerated faces should now be properly fixed or rejected when importing a Re-Volt meshes (PRM / M / W).
ADD: On import, automatically select the DATA tab in the properties panel (to make it easy to find the Re-Volt Panel) and automatically unroll the sub-panel according to the imported format.
MOD: The add-on makes use of some material options that rely on the Blender Game engine (for example for texture transparency or backface culling). Previously it seemed to work in the Blender Render engine as well, but I presume this has been enforced and now the Blender Game Engine has to be selected. This can be done manually from the Info toolbar at the top of the Blender window.
MOD: To avoid relying on Lamps to light the mesh in textured draw mode, the shadeless Blender mode is used. It was previously set per material, it is now set globally (to do it manually, in a 3D View in textured mode, press [N] to display the "Properties" panel, in the "Shading" section there's a "Shadeless" option).
ADD: (NCP panel in Edit mode) Added a "Clear" button to quickly set material to "NONE" for selected faces (faster than selecting "NONE" then "Apply").
ADD: (NCP panel in Edit mode) New operator to select non-planar faces with modifiable threshold. The computation has been improved too. The operator now computes the "thickness" of the face along the face normal direction. If this value is above the given threshold, the face is selected (note that the current selection is not flushed before). It is not based on faces angle like the "Split Non-Planar Faces" tool in Blender, because a very small angle may lead to great faces mismatch for large polygons.
REM: Removed support for the Non-Planar face flag in the NCP panel. This is not used in Re-Volt, and was no longer suitable in Blender as well. This has been replaced by the more convenient selection of non-planar face.
MOD: Take into account that several Cameras Visiboxes can share the same ID.
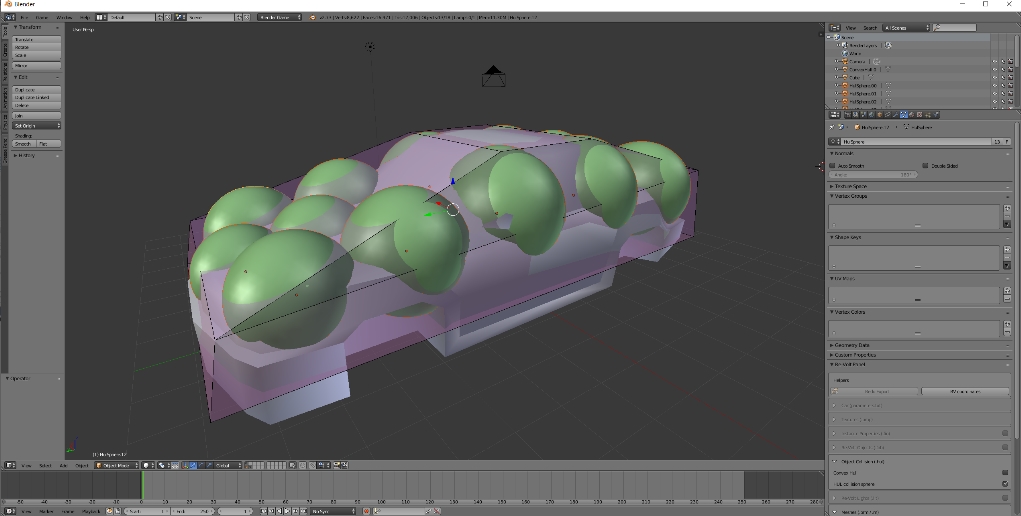
MOD/ADD: A checkbox is used to clearly mark the Re-Volt type of object for file formats: FIN, FOB, HUL (Convex Hull and Collision Sphere), LIT, RIM, TAZ and VIS. Only objects marked with the appropriate type will be included when exporting to one of these formats. And an object marked as such will automatically be rejected when exporting to PRM or W format, even if still visible.
MOD: A lot of code rewriting.


@burner94
Thanks for the help. I was still struggling until I found out that I had to install it via the .zip file! This helps a lot.
@rynii-chan
A quick Google search returns the 2.73a documentation. Here’s what it says:
Open the user File -> User Preferences, Select the Addon section, press Install Addon… and select the file.
Now the addon will be listed and you can enable it by pressing the check-box, if you want it to be enabled on restart, press Save as Default.
How do I install this!?!?!? There are no instructions on how to (not even on his readme file) and the ORP forum no longer exists (instead it redirects me to somewhere totally irrelevant).
I have Blender 2.73a installed, so HOW can I install and use this!?
Plugins for 2.73 won’t work on 2.79. The description clearly mentions the required version (which is also hosted on Re-Volt World and can be found here: https://www.revoltworld.net/dl/blender273a/). You can have multiple versions of blender installed side by side if you want, the system doesn’t prevent you from doing so.
Please, consider reading file descriptions more thoroughly – thank you for your understanding.
i’m using blender 2.79, it don’t work :/
Cactoking, which version are you using for blender. If its not blender v2.73a, it wont work. If you dont want to switch versions and you are already using the newer version, install Marv’s Blender Plugin for Modern Blender by Theman.
please help, it don’t work at all! only show’s errors!
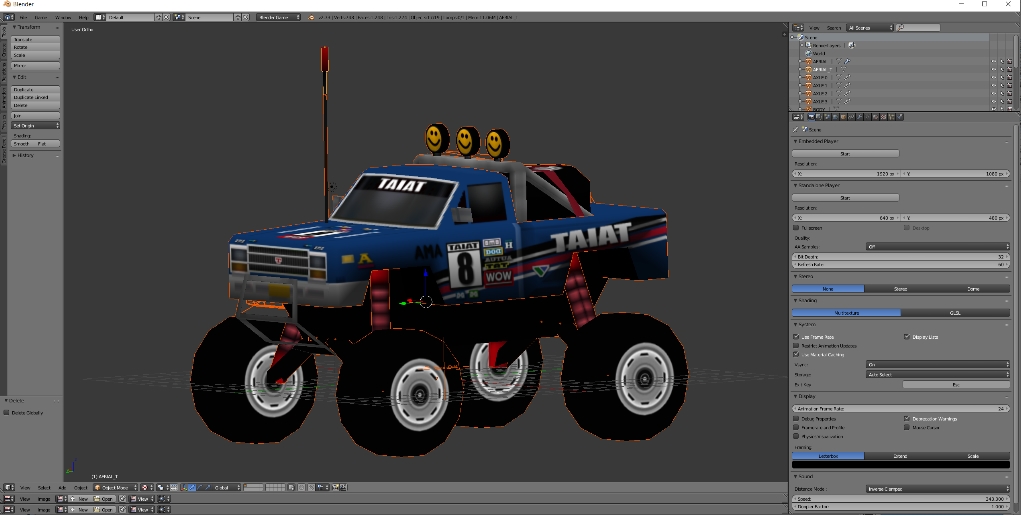
Still one of the best Blender plugins available for Revolt/RVGL. It is especially helpful for loading a cars parameter file to check alignments of all the cars parts